Going through a bunch of files on my computer earlier today, I came across a collection of DIY project images which I'd planned to share with you a while back via a 'how to' post. Well, better late than never...
So, one of the fundamental elements of crisp, punchy photographs - much aside from good exposure and composition - is that of camera support. Back in the good old days, long before Canon's Image Stabilization and Nikon's Vibration Reduction technologies were around, we had to rely upon steady nerves, heavy tripods and a knowledge of the slowest shutter speed one could confidently hand-hold their camera.
Some things never change and, me being the traditionalist at heart, I still work in the same way - for example, often turning down the offer of heavily caffeinated drinks early in the morning, especially on an empty stomach, so as to keep the shakes at bay.
Now, of course, there are all manner of newfangled brackets, grips, tripods and braces available to help us out of those situations where, quite literally, we could do with a helping hand. But often, they come with a hefty price tag.
Here's how to make a quick and simple, light-weight support for a fraction of the cost, using a number of easy to find components...
You will need:

1x Double suction lifter (I got mine from B&Q)
1x Small ball & socket tripod head (Such as the Hama 50mm)
1x Rubber door stopper
1x 1/4" thread bolt (but do make sure the thread size matches that of your tripod head)
1x Saw (I used a junior hack saw)
1x Knife (Stanley knife)
1x All-purpose glue (if required)
Step 1: Measure the suction lifter handle length and cut in the middle. This effectively gives you the basis of two mounts (if you like, just double-up on the other components and repeat Steps 2-3).

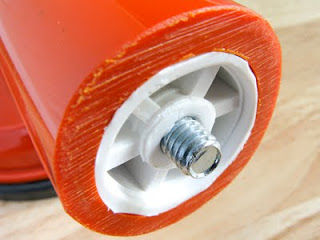
Step 2: Using the knife, carefully trim the door stopper to size, so that it will be a tight fit when pushed into the open end of the mount (as you can see, this isn't exactly a perfect, pretty-looking part once finished, but don't worry too much about this - it wont be visible by the time you're done).
Screw in the bolt and position the stopper as in the picture below. For extra hold, this is where you might want to use the glue.


Step 3: Attach the tripod head to the bolt until it holds firm.
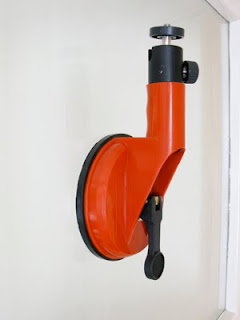
The end result should look like the object in the picture at the top of this post and, with the lever in the 'down' position, will lock securely to a great many surfaces. To release, simply return the lever to the upright position.
Here it is attached to a window:

This is just one variation of a DIY suction mount; search around online and you are bound to find more. However, it has served me well in many situations, specifically where I want to place my Canon G9 in remote places (such as to shoot video footage).
It can be used to hold smaller items such as compact cameras and flash guns; I would not recommend it for heavier kit such as DSLRs.
Whatever your intended use, I would make one suggestion - if setting it up in a place with any considerable drop below, or where there is a risk that it could damage anything (such as a car door panel), you'd be wise to incorporate a safely line which can be attached to a nearby object. It's much better to have your kit swinging in the breeze than come crashing down to earth with the promise of a costly repair bill!


